Recreating a Boy’s Axe

wideI should have published this a year ago, but life has a way of burying you. This is a project that I completed last year for my friend and antique sword collector, Lee Jones.  Lee is a retired pathologist who has been collecting antique swords and weapons for a good portion of his adult life. Lee was friends with Ewart Oakeshott and many of the other major collectors of swords and weapons.  Lee’s private collection is arguably one of the finest ancient sword collections in the United States.

During the fall of 2016, I had the privilege of joining swordsmiths Peter Johnsson and Kevin Cashen at Lee’s house to document swords from his collection.  Lee was a gracious host.  We enjoyed several evenings listening to Lee tell the stories of how he collected many of the outstanding items in his collection.  Of course, he allowed us to handle and document a group of amazing swords in his collection. A wonderful Alexandria arsenal sword and an amazing Ulfbert were just two of the highlights.  Lee also showed us a number of axes and other weapons in his collection.

At one point, Lee brought out this tiny axe, and explained that it was in the tomb of a Viking boy. It was found with a small sword, shield boss, and spearhead.  The axe was very corroded, but there was something charming about.  It had an alluring presence about it.  Perhaps it was because it spoke volumes about the love of a father for a son who had departed too early.  Whatever the reason, I was drawn to it. I spent the good part of an hour documenting the small axe.  During the last day of our stay, Lee asked me if I would be interested in making a reproduction of the axe for his private collection. I was honored, and of course, I said “yes.”

This axe is mentioned in Ian Pierce’s book, Swords of the Viking Age, on page 86 in the caption of the picture of the boy’s sword. The axe, as well as the sword, spearhead, and shield boss, were found in Ringebu, Oppland, Norway.

Location of Ringebu
Location of the  Ringebu municipality in Oppland county, Norway.


I asked Lee if he would provide some information on how he acquired the axe. Here is the story:

small-axes-group-bThis diminutive Viking style axehead came most recently from the extensive antique European arms and armor collection of Howard M. Curtis, athlete and noted Hollywood stuntman. First coming to wide notice in the television series Ripcord, Mr. Curtis’ film career ran from 1957 until his untimely death in 1979 when during a benefit skydiving demonstration he attempted to save an amateur skydiver whose lines became entangled and who then panicked, leading to a free fall death for both men.

Mr. Curtis’ extensive collection and supporting specialized library came to a single-owner sale at Christie’s in London in the fall of 1984. This axehead was one in a lot of eight items (#144), incidental to a Merovingian francisca head. Shortly thereafter the specialist dealer who had managed my purchases at that auction was contacted by another of his clients about the small axehead. This collector had acquired the same axehead, along with a similarly small sword in the late 1960s and the sword, this axehead, a small spearhead, arrowheads, a shield boss and cloak pin – all of similarly reduced proportions – were reported to have been found in the late 19th century in a boy’s weapon burial at Ringebu, Norway.

Following Mr. Curtis’ death this collector, from whom the axe head and sword had previously passed to Mr. Curtis, had contacted the family about reacquiring the items. He was successful in reclaiming the sword, but the axe head could not be found within Mr. Curtis’ extensive collection at that time and it eventually ended up at Christie’s. The collector later rediscovered the spearhead and facilitated its reunification with the sword and axe head, but the fate and location of the other items in the group remains unknown.

Since the axe was heavily corroded, I had to make an educated guess as to the original shape.  I sketched the axe out then made a drawing in Illustrator that would serve as my guide for the reproduction. I forged the axe slightly large, so that I could grind and file it to the final dimensions on the drawing.  In the picture below (R), you can see a black line around the perimeter of the head that represents the axes final dimension after grinding and filing.


close
The axehead in its final shape being fitted to the ebonized oak haft.

I utilized refined, 19th century wrought iron that was from links in an anchor chain. I wanted the body to have clear slag lines to give it the appearance of ancient iron. The iron had very nice slags lines that formed a pleasing random pattern on the axe body once it was etched.  The bit was forge welded into the body and is 1080 high carbon steel.

Around the same time I was making this axe, I was experimenting with ebonizing oak to give it a bog oak appearance. The haft on this axe is a piece of oak that I ebonized while I was experimenting with the process.  Here is a link to my blog explaining the process.

Overall, I am very pleased with the result. It is always a guessing game when you are reproducing an artifact that is corroded, but I feel that I was able to stay true to the original shape of the piece. The 19th century iron and ebonized haft combine to make a convincing reproduction. When I shipped the axe to Lee, I received this lovely email explaining his react to the axe.

Dear Eric,

The axe arrived in perfect order this afternoon, obviously very well packaged to prevent damage to either the delivery man or to the axe. I was immediately and unexpectedly struck by just how well it felt in the hand – what a terror a ten year old might become with this in one hand. In old India there were some axes with heads almost this small that were clearly formed for function as adult’s weapons. Anyway, I can surely see why you have gained such a reputation for making fine classical axes. The etched, patterned body is most impressive and is made even more so by the contrast to the brightly polished inserted edge. I especially like that. The shaping and finish of the haft are superb and I am really enjoying seeing and feeling how different the whole of the weapon is when compared with the rusted remains of the head alone.

The next time I have the right light and am set up for photography I will take some photographs of your recreation along with the original group of artifacts and send them along to you. It is nice to make the comparison with what the rusted axe might have looked like a thousand years ago, though I am confident that it was never quite as nice as the axe you have made. I thank you for your thoughtful kindness…

Many thanks and very best regards…   Lee


Gallery of Photos:

Early Medieval Sword (Geibig 6)

widebladeThis project is a custom recreation of an early medieval sword with basic specifications by the customer.  Similar swords saw use in the late 10th century to the mid 11th century. The blade is forged 80CRV2 high carbon steel. Fittings are forged mild steel. The scabbard and grip are dyed a pleasing burgundy red.  The blade can be classified as a Geibig 6, but there is always some ambiguity when typing these swords.  The scabbard is thin wood layers that were glued together to form a core. The core was then covered in leather and stitched on the back side. The laced scabbard belt is dyed black.  This type of belt was a common style used by the Normans (and others) during this period.

I have been trying to incorporate in my design work the principles of geometric design that I have been learning from noted swordsmith and researcher, Peter Johnsson. I do not claim to fully understand the use of all of these principles, but I am a firm believer in learning by doing and by making mistakes.  Below is a picture of the geometric strategy that I used for this project. It reflects an early attempt at utilizing these principles.

GeojpegWhile I firmly believe there is nothing magical or mystical in these principles, I believe that these geometric strategies help to create designs that are pleasing to the human eye.  There are shapes and proportions that strike a chord with us. Perhaps this is one reason these principles were used by master of various crafts throughout history.

Since this project, I have made several more designs in which I have used the lessons learned from this project.  My hope is to move step-by-step closer to a deeper understanding which in turn will help me to create more pleasing designs for future projects.

Pictures (click to enlarge):


Geibig 6 Work Continues

Just finished peening the pommel onto the tang of the Geibig 6 11th century sword. In my opinion, setting and peening the pommel is the most stressful moment for me. If it goes badly, countless hours of work are ruined, and you now have an opportunity to redo the work again. When it goes well, you end up with an invisible (or nearly invisible) peen that when shaped, conforms to the geometry of the pommel.

I haven’t documented many pommels like this one, so I admit I combined details from a number of period pommels that were designed by Peter Johnsson for Albion Swords. Because of my work with Peter in bringing these swords to market, it is inevitable that my custom work will consciously or subconsciously be influenced by these design.  It used to bother me. I had this notion that I wanted my art to be grounded in originality, but the truth is that as artists, we are all influenced by something or someone. As the old saying goes, “There is nothing new under the sun.”  In the end, I count it a privilege to be influenced by Peter.

I spent a lot of time forging this pommel. It looks deceptively simple. I was surprised by how complicated it really was to forge.  It has subtle changes in geometry that can be lost with careless forging.  After the pommel is forged,  I do the initial grinding on the piece. I, then, like to spend time filing the piece to shape. Filing gives it a handmade, period look.  Filing also allows for me to leave a few small forge pits that add character and a period look to the piece. I finished the pommel by hand sanding to 600 grit, then followed with a scotch-brite pad to draw it back to a smooth satin finish.

The photos show how the peen can be blended to look invisible, and also a close-up that shows the boundary of the peen.

This slideshow requires JavaScript.


Gladius Hispaniensis Completed

wide

This is a custom gladius hispaniensis that was ordered by a customer. The blade is based on a design from Peter Johnsson that draws heavily from LaTene blades as well as examples in Christian Miks 2 volume set on the Roman gladius. Specifically, a late 2nd century BCE find from Mouriès, France (Miks, A512).

The hand forged blade is made of 80CRV2 steel. The hilt components are black walnut with black walnut burl for the grip. Guard plate, rivet block and decorative wire are bronze.

SPECIFICATIONS:

Overall length: 31.5″ (80,01 cm)
Blade length: 24.25″ (61,6 cm)
Blade width: 2.125″ (53,9 cm)
Length of grip: 3.6″ (9.1 cm)
Weight:  1.9 pounds (860 grams)
Blade Material: 80CRV2
Hilt Material: black walnut and bronze
Grip Material: black walnut burl

Photos:

widepommelhilt2hiltguard

Customer Review:

I commissioned a Roman Gladius Hispaniensis from Eric after seeing a previous Roman Gladius project he did. After brief conversations with Eric I could already see the passion and authenticity he made high for himself in his work. I had talked to many swordsmiths in the North American region everyone lacking one quality over the other. Eric did hours of research to forge the blade to its proper shape. Always communicating very daily on details of the blade as it was forged. Using high quality metal in this case 80CRV2 which is a very hard, durable steel.

I would highly recommend Eric’s work to anyone looking for serious craftsman work. There are no shortcuts or cheap standards in his work. By far one of the best communicators in the business as well and very easy to get along with. I will surely be going back for more of Eric’s craftsmanship as I assemble a Roman Legionary kit.

— Zach B.

15th Century Rondel Long Dagger – SOLD

widefinal2

A rondel long dagger in the style of 15th century military daggers. The blade is hollow-ground and made from hand forged 1080 high carbon steel. The mild steel fittings are based on a number of examples in the Royal Armoury at Leeds. The grip is hand polished ebony.


This dagger features a number of period specific details:

  • Hollow, octagonal discs that are riveted together
  • Decorative rivet finials on the pommel disc
  • Blended peen on a spherical rivet block
  • Stout, hollow-ground blade with reinforced tip

Photo Gallery:

SPECIFICATIONS:

Overall length: 26.7″ (67,9 cm)
Blade length: 21.18″ (53,8 cm)
Blade width: 1.01″ (2,57 cm)
Length of grip: 4.2″ (10,9 cm)
Weight: 17.9 oz. (507 grams)
Blade Material: 1080 high carbon steel
Hilt Material: 1018 mild steel
Grip Material: Ebony

If you are interested in purchasing this dagger, contact me at eric@crownforge.net or ericmycue374@comcast.net.

Note: The crafting of a simple period appropriate sheath for this dagger is included in the price of this piece.

Pattern Welded Late 14th Century Dagger with Sheath – SOLD


marqueepic3A dagger in the style of late 14th or early 15th century long daggers. The blade is 350 layers of torsion (twist) style pattern weld composed of L6 and 1095 steel. The hilt fittings are inspired by a number of common european quillon daggers.

combineddaggers
Historic Examples: (L) Short-sword or long-dagger from Philadelphia Museum of Art. (R) Dagger from British Museum

Some examples in museums have quillons that are more lobe shaped, but others feature faceted surfaces with filework accents. My approach was to combine elements of different examples to create a harmonious and elegant guard.  The result is a guard with octogonal quillons, well defined facets, pleasing arc shape, and crisp filework accents. 

hiltandpattern21.jpg

The tang slot was drifted then filed to a precise shape to create an interference fit between the guard and the blade shoulders.  In addition, an inset for the blade shoulders was hand forged into the center of the guard with a drift that was the same dimension as the blade. _____________________________________________________________________________________________________________________________________________________________________________________________________________________________________________________

hiltandsheath21-e1499958680789.jpg

The pommel is based on the familiar “wheel style” and has a slightly oval profile.  It is topped with a small frustum shaped rivet block that is accented with additional filework. The guard and pommel are both made from 1018 low-carbon steel, and polished to a high luster and then drawn back to a consistent satin finish. _


To facilitate the fitting of the pommel to the tang, a hole was drilled through the exact center of the pommel.  A tang shaped drift was used to form the centered hole to the shape of the tang. This slot was then cleaned up with a file in order to make a precise interference fit between the pommel and tang.

hiltandgripweb

The grip is composed of a hardwood core with a linen and leather cover, and features three half-round risers to help fill out the volume of the grip without making it appear bulky and unattractive. 

IMG_4737


The hardwood core was formed in two pieces which were chiseled and carved to the tang dimensions.  The core was then glued in place. Linen string was used to establish the foundation of the three risers. The core and risers were then covered in leather which was secured in place with hide glue. ___________________________________________________________________________________________________________________________________________________

pattern21.jpg

The blade is composed of 350 layers of L6 and 1095.  The pattern weld billet was given a rather tight twist, and then forged flat.  The result is a striking pattern that displays some star-like effects as well areas that are like wood grain.  Although it is a stout blade, it had a fair amount of distal taper that comes to an efficient awl like point.


IMG_4741

The sheath that comes with the dagger is constructed with a thin wood core that is covered in high quality leather. The seam of the leather cover is sewn shut with linen thread in a “Z” pattern which is quite common on surviving examples from the period.

________________________________________________________________________________________________________________________________________________________________

Decorative lines were inscribed on the front of the scabbard with a polished bone knife. Drawing inspiration from period examples, this type of leather work does not utilize leather working tools that are often seen on high-quality leather work. It is rather a clever answer to the desire to have a decorative flare on knife and dagger sheaths (or sword scabbards) without the need for the tools and experience to do more complex leather work.

widewithsheath.jpg

The artisan would simply use a bone-knife, hardwood stylus, or burnishing needle and combine it with a straight edge or other guide to incise various shapes, lines, and figures into the surface of the damp leather.  Some period examples show a great deal of freehand work with the stylus.  The result is a sheath that is both pleasing to the eye, yet frugally produced. For this period inspired sheath, straight evenly spaced incised lines were made with the thin tip of a bone knife to create a somewhat abstract “feather” effect on the front of the sheath.

A belt or suspension loop was purposely left off of the sheath so that the new owner can decide what type of suspension he or she would like to have.

img_4813.jpg

The iron chape at the end of the sheath was hand forged over a mandrel that was identical to the dimensions of the the sheath end.  The result is a chape that fits perfectly over the end of the sheath.  There is a small amount of decorative filework at the top of the chape. Finally a small orb-like finial was added to the tip of the chape.


PICTURE GALLERY:

REVIEW BY PETER JOHNSSON:

I had an opportunity to show this piece to renowned swordsmith, Peter Johnsson, and I asked him to write a short review:

A Long Dagger in the Medieval Tradition

This beautiful dagger has a strong understated elegance about it. It´s form is clearly rooted in the medieval european tradition, inspired by surviving examples of these long slim weapons that straddle the distinction of dagger and short sword. The unusual proportion between hilt and blade sometimes cause these weapons to misleadingly be labelled “Sword for a child” despite the fact their blades are not scaled down sword blades. They have a robust awl like point and a cross section that is much stouter than what you would expect in a sword. They are simply unusually large daggers with a very purposeful design.

It is evident that Eric has based the design of this dagger on detailed observation of originals from the 14th and 15th century. The aesthetics of the period is present in the shaping of the hilt components but not limiting in his choice of material. The blade shares the functional properties of the originals but with added joy for the eye in its bright and crisp pattern welded construction.

As a fellow maker I find work of this level inspiring. I see how Eric has studied and internalised the finer details of function, aesthetics and methods of craft and design and internalised these ideas in a way that allows him to freely express himself in a seemingly effortless manner. The result is a unique dagger that express the joy of the craft and its roots to an ancient tradition.

                                                                                                                    – Peter Johnsson, Swordsmith

SPECIFICATIONS:

Overall length: 21.375″ (54,3 cm)
Blade length: 16″ (40,6 cm)
Blade width: 1″ (2,54 cm)
Point of Balance: 1.125″ (2,86 cm) from bottom of guard
Weight including sheath: 1.1 lbs (500 grams)
Weight of dagger: 0.91 lbs (413 grams)
Blade Material: Pattern welded steel, L6 and 1095, 350 layers, twist pattern
Hilt Material: Mild steel guard and pommel. Wood core with leather cover

Price: $2,200 USD SOLD

_________________________________________________________

Comments from the new owner:

Recently, Eric, after a discussion with his good friend Peter Johnsson, contacted me to see if I would be interested in this dagger. Initially, I declined the offer because I already had a number of commissions for the upcoming year, but after a few hours of reflection and closely studying the photos, I hurried to contact Eric again to buy this dagger. I am glad I did because this dagger exceeds all my expectations. The degree of finish is incredible (as an owner of a sword from Peter Johnsson, I have good references) as is the sharpness of the damask, the details of the pommel, guard and chape of the scabbard. The balance of the weapon and its sharpness are such that if you take it in hand, you feel that you want to fight hand-to-hand with a knight in armor and to introduce your point between the plates of steel and hear the knight scream « Miséricorde »… and get back a ransom from his family (and pay Fedex – private a private joke with Eric). “Miséricorde (Mercy) or Daguasse” is the name in French of this type of “long” dagger which was not a weapon of left hand but used with right hand. By-the-way this is my second purchase with Eric. The first one was a small Danish axe (with two steels) which is in reality the most murderous weapon in my collection. An example of this is the exercises of cutting an old armchair covered with thick leather (you can think about a fat warrior with leather armor) which is very different and really more difficult to cut than plastic bottles filled with water as often seen on Internet (in my experience, most swords fail to really cut, it is an interesting experience). My conclusion is that Eric is really one of the best blacksmith. This is evident by his knowledge of the steel but also by his degree of knowledge of the history and by the finish of his work. Furthermore, he is a really nice person – as is his friend, Peter!

                                                                                                                               — Pierre

Single-hand War Axe with Ebonized Haft

wide
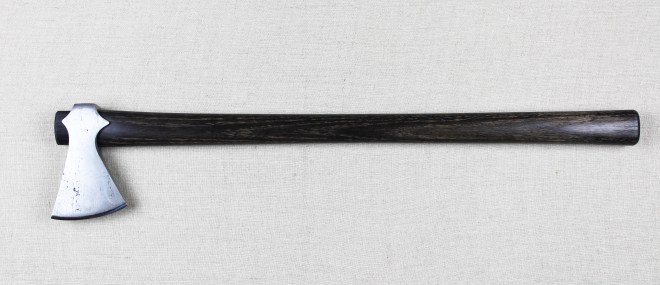
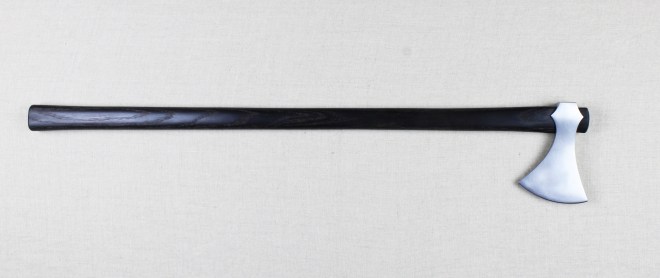
This is the final axe in a series of three hand forged, single-hand war axes I’ve been finishing.  Like the previous two axes, this axe is patterned after the many examples of late 10th to early 11th century single-hand war axes.  This type of axe was an agile yet brutal weapon that would have been a common choice for a soldier fighting in close quarters or in a shield wall. ……………………………………………………………………………………………..

profile

This axe features a 1018 low-carbon steel body and eye socket and a 1080 high-carbon steel bit. The body and eye were drawn out like a “bow tie.”  The two sides were forge welded together to form the body.  The eye was further refined by forging over a steel mandrel to arrive at the desired socket shape. ………………………………………………………………………………………………………………………………………………………………………………………………………………………………………………………………………………………………………………………………….

shapinghaft

The hardwood haft is made from hand hewn oak. Careful attention is given to the grain direction. Having the grain run parallel with the head (edge to poll) helps to prevent cracking when a powerful cut is made.  I use rasps and scrapers to shape the top of the haft to a tight fit with the eye socket.  This helps to prevent the axe head from twisting or moving during use. ………………………………………………………………………………………………………………………………………………………………………………………………………………………………………………………………………………………………………………………………………………………………………………………………………………………………………………………………………………………………………………………………………………………………………………………………………………………….

IMG_4471
The wedge is pre-fit to the top of the haft to create the correct amount of widening to secure the head to the haft.

Once the top of the haft is correctly shaped for the socket, I carefully saw a slot for the wedge.  The wedge is cut from the same section of wood as the haft so the grain direction and size will be similar to the haft.  The wedge is then pre-fitted to the slot.  This creates a mushrooming of the haft above the top of the axe head that secures the head in place. …………………………………………………………………………………………………………………………………………………………………………………………………………………………………………………………………………………………………………………………………………………………………………………………………………………………………………………………………………………………………………………………………………………………………………………………………………………………………………………………………………………………………………………………………………………………………………………………………………………………………………………………………………………………………………………………………………………………………………………………………………

tannicacidapplication
Tannic acid and iron acetate are applied to the haft.  The two solutions react in the fibers of the wood staining it black

The haft was also ebonized to give it a faux bog oak appearance.  This process, which I explain in my essay “Making Your Own Bog Oak Axe Haft,” deeply stains the wood fibers giving the haft the inky black appearance of bog oak.  Unlike regular wood stains, this process occurs in the wood fibers and creates a much more durable finish. …………………………………………………………………………………………………………………………………………………………………………………………………………………………………………………………………………………………………………………………………………………………………………………………………………………………………………………………………………………………………………………………………………………………………………………………………………………………………………………………………………………………………………………………………………………………………………………………………………………………………………………………………………………………………………………………………………………………………………………………………………

click to enlarge images:

Specifications:

  • Body and Eye: 1018 low carbon steel
  • Edge Bit: 1080 high carbon steel
  • Haft wood: Oak
  • Blade Length (toe to heel of bit): 3.875″ (9,84 cm)
  • Axe Head Length (edge bit to poll): 5.375″ (13,65 cm)
  • Haft Length: 28″ (71,1 cm)
  • Overall Length: 29.875″ (75,9 cm)
  • Axe Head Weight: 0.84 pounds (381 grams)
  • Weight: 1.5 pounds (678 grams)

Price: $635 (plus shipping) SOLD

If you are interested in purchasing this axe, contact me at eric@crownforge.net or ericmycue374@comcast.net.

………………………………………
Comments from the owner:

I have been a long time collector of historical weapons but had no axes in my collection. I came across Eric’s work, and was impressed by his attention to detail. The axe arrived in perfect condition and did not disappoint. The axe is well made and excellently balanced. It is solid to swing and bites hard. The axe head itself is perfectly formed and fit perfectly to the shaft. The ebonizing effect is a beautiful addition to the oak, and brings out the grain in a way that stain would not.

                                                                                                                                — Douglas Pierce

………………………………………………………………………………………………………………………………………………………………………………………………………………………………

Making Your Own Bog Oak Axe Haft

bog-oak
Large log of bog oak

The very first custom piece that I ordered was an Irish skean with a bog oak grip. While the knife itself was not that elaborate, I remember that the bog oak grip was excellent.  It had an inky black color that really brought the whole piece together. Ever since that point, I have been drawn to bog oak.

It is hard to find a large enough piece of bog oak that has a really desirable inky blackness to it; so I’ve been experimenting with making my own bog oak in my shop (minus the bog and the thousands of years for the reaction to take place).

Bog woods form when the acidic, iron rich water (iron acetate) of the bog reacts with the tannins in the wood.  This reaction stains the fibers of the wood.  The color of the staining process ranges from dark brown to inky black.

chair
An ebonized oak chair

Around the time of the 16th century, woodworkers utilized this reaction between iron acetate and tannic acid to turn woods black (or darker depending on the type wood). This process is know as ebonizing.  Unlike stains which are more of a surface treatment, ebonizing (like bog wood) reacts in the fibers of the woods making the finish much more durable.  In other words, the coloring is integral rather than just a surface treatment.

Armed with this information, I set out to make a bog oak haft. The first thing I did was to make the iron acetate.  This was a simple process.  I washed a pad of 0000 steel wool with soap and water to remove any oils, and I placed it in the mason jar.  I then filled the jar to the top with Heinz white vinegar. You need to put a small hole in the lid because the reaction will give off a lot of gas. Which brings me to my next warning: Do not do this in your house because it produces a strong smell.  After 5 days, the pad was completely gone.  I then put another pad in the solution and left it for 5 more days.  5 days is enough time to give the vinegar an opportunity to dissolve all the steel it can handle.  I then filtered the solution using coffee filters to remove any solids.

I put the iron acetate on the shelf and worked on the haft.  Once I finished all of the shaping and fitting to the axe head, I sanded the haft to 320 grit.  You want to use fresh sand paper and a light touch so you do not burnish the grain closed.  This was something that happened on my smaller scale experiments.  You want to raise the grain of the wood at least twice and sand again with 320 grit.  Once I was finished with the sanding, I deglazed the wood with acetone to remove any oils that may be on the wood surface.  I then set up my work table to do the ebonizing process.

mixingofpowder
The Quebracho powder is added to a smaller quantity of distilled water in a sealed jar. The jar is then agitated to help dissolve the powder.

The first step in ebonizing the haft was to make the tannic acid solution.  After researching tannic acid powders, I contacted the fine people at Shellac.net and they advised me to purchase Quebracho bark powder. Quebracho powder is from the bark of the Quebracho tree and it contains 74-77% tannins which is much higher than other commercially available tannic acid powders. ……………………………………………………………………………………………………………………………………………………………………………………………………………………………………………………………………………………………………………………………………………………………………………………………………………………………………………………………………………………………………………………………………………………………………………………………………………………………………………………………………………………………………………………………………………………………………………………………………………………………………………………………………………………………………………………………………………………..

quebrachomixing
The correct amount of Quebracho bark powder is measure and mixed with 8 ounces of distilled water. After the powder is thoroughly mixed and in solution, more distilled water is added to bring the solution to the correct ratio of powder to water.

This stuff is a massive irritant, so I wore a respirator, nitrile gloves, and eye protection.  I began the process of making the solution by putting the correct dry quantity in a mason jar and adding a portion of the required amount of warm distilled water.  I put the lid on and shook the jar till the powder was completely dissolved.  I then added the concentrate to the rest of the warm distilled water in a glass container. …………………………………………………………………………………………………………………………………………………………………………………………………………………………………………………………………………………………………………………………………………………………………………………………………………………………………………………………………………………………………………………………………………………………………………………………………………………………………………………………………………………………………………………………………………………………………………………………………………………………………………………………………………………………………………………………………………………………………………………………………………………………………………………………………………………………………………………………………………………………………………………………………………………………………………………………………………………………………………………………………………………………………………………………………………………….

tannicacidapplication
The tannic acid solution is applied 4 or 5 times. The haft is allowed to dry in between each application.

Next, I brushed the tannic acid solution on the wood.  From previous experiments, I developed a technique of brushing the solution onto the wood liberally for 5-8 minutes, and then allowing the wood to dry on the surface for 20-30 minutes before applying another coat.  The goal is to allow the wood to absorb as much of the tannic acid solution as possible.  I applied the solution 4-5 times, and let the haft dry completely for several hours.  Note: at this point, the solution was not really a nasal irritant, so I removed my respirator.  I still wore eye protection and nitrile gloves. …………………………………………………………………………………………………………………………………………………………………………………………………………………………………………………………………………………………………………………………………………………………………………………………………………………………………………………………………………………………………………………………………………………………………………………………………………………………………………………………………………………………………………….

applicationofironacetate
Iron acetate solution is applied to the haft.

After several hours, the haft was dry and I started the next step: application of the iron acetate. Over the course of an hour, I applied iron acetate to the haft at 8-10 minute intervals.

At first, there was little reaction, but the following pictures will show the transformation of the wood over an hour. ………………………………………………………………………………………………………………………………………………………………………………………………………………………………………………………………………………………………………………………………………………………………………………………………………………………………………………………………………………………………………………………………………………………………………………………………………………………………………………………………………………………………………………………………

10-15 Minutes

10to15minutemark
After 10 to 15 minutes, the wood is starting to darken. The darkening occurs first in the grain lines. As the iron acetate soaks into the wood, more solution is brushed onto the haft.

……………………………………………………………………………………………………………………………………………………………………………………………………………………………………………………………………………………………………………………………………………………………………………………………………………………………………………………………………………………………………………………………………………………………………………………………………………………………………………………………………………………………………………………………………………………………………………………………………………………………………………………………………………………………………………………………………………………………………………………………………………………………………………………………………………………………………………………………………………………………………………………………………………………………………………………………………………………………………………………………………………………………………………………………………………………………………………………………………………………………………………………………………………………………………………………………………………………………………………………………………………………………………………………………………………………..

30 Minutes

30minutemark
At the 30 minute mark, the wood is noticeably darker. It looks similar to Wenge. At this point, the reaction can be stopped to create bog oak that is on the lighter side of the spectrum.

……………………………………………………………………………………………………………………………………………………………………………………………………………………………………………………………………………………………………………………………………………………………………………………………………………………………………………………………………………………………………………………………………………………………………………………………………………………………………………………………………………………………………………………………………………………………………………………………………………………………………………………………………………………………………………………………………………………………………………………………………………………………………………………………………………………………………………………………………………………………………………………………………………………………………………………………………………………………………………………………………………………………………………………………………………………………………………………………………………………………………………………………………………………………………………………………………………………………………………………………………………………………………………………………………………………..

1 hour

1hourbogoak
After one hour and several more applications of iron acetate, the color of the wood is nearly jet black.

…………………………………………………………………………………………………………………………………………………………………………………………………………………………………………………………………………………………………………………………………………………………………………………………………………………………………………………………………………………………………………………………………………………………………………………………………………………………………………………………………………………………………………………………………………………………………………………………………………………………………………………………………………………………………………………………………………………………………………………………………………………………………………………………………………………………………………………………………………………………………………………………………………………………………………………………………………………………………………………………………………………………………………………………………………………………………………………………………………………………………………………………………………………………………………………………………………………………………………………………………………………….

Finishedbogoakdry2
After the final wash with the tannic acid solution the reaction of iron acetate and tannic acid is complete and haft is dried over night. The color of the wood at this point is nearly jet black.

After the last application of iron acetate, I allowed the haft to dry completely. Once the haft was dry, I gave it a final wash in the tannic acid solution, and allowed it to dry overnight.

The next morning, I wiped the haft surface with a clean cloth to remove any dried solution.  I then buffed the haft with 0000 steel wool.  The staining from the reaction is deep in the wood fibers, so the steel wool did not remove or lighten any of the inky black color. The picture to the left shows what it looked like the next morning after being buffed with the steel wool. …………………………………………………………………………………………………………………………………………………………………………………………………………………………………………………………………………………………………………………………………………………………………………………………………………………………………………………………………………………………………………………………………………………………………………………………………………………………………………………………………………………………………………….

close
Recreation of a boy’s burial axe from the collection of Lee Jones with an ebonized oak haft.

Actual bog oak has a range of darkness to it: from dark brown to inky black.  It is possible to select a wide range of shades by adjusting the amount of iron acetate you allow to soak into the wood and then rinsing it in distilled water once the desired darkness is reach.  It is a good idea to stop a shade or two lighter than you want because even with the water rinse, the reaction will still continue in the fibers for a short time.  When I made the haft for the recreation of the boy’s burial axe from Dr. Lee Jones’ collection, I wanted a lighter style of bog oak, so I only used a few applications of the iron acetate and rinsed it with distilled water when it was close to what I wanted. The picture on the left shows the final product. ……………………………………………………………………………………………………………………………………………………………………………………………………………………..

One of the big differences with this process and actual bog oak is the depth of the reaction. Actual bog oak has been exposed to the reaction for thousands of years, so the dark finish runs all the way into the center of the wood.  I have found that I can achieve a depth of 2-2.5 mm by allowing the solution to soak into the wood with multiple applications. This makes a very durable finish.  As I mentioned above, the steel wool did not remove or lighten any of the finish when I buffed the haft.  I would, however, like to see if I can get the reaction to go deeper into the wood for the purpose of carving and other decorative elements. I’ve tried some smaller tests in my vacuum chamber with some promising results, and I plan to experiment with larger pieces to figure out the process.  More to come in the future!

……………………………………………………………………………………………………………………………………………………………………………………………………………………………………………………………………………………………………………………………………………………………………………………………………………………………………………………………………………………………………………………………………………………………………………………………………………………………………………………………………………………………………………………………………………………………………………………………………………………………………………………………………………………………………………………………………………………………………………………………………………………………………………………………………………………………………………………………………………………………………………………………………………………..

Single-hand War Axe

wideview

This is the second axe in a series of three hand forged, single-hand war axes I’ve been finishing.  Like the single-hand, wrought iron axe, this axe is patterned after the many examples of late 10th to early 11th century single-hand war axes.  This type of axe was an agile yet brutal weapon that would have been a common choice for a soldier fighting in close quarters or in a shield wall.

edgeviewThis axe features a 1018 low-carbon steel body and eye socket and a 1080 high-carbon steel bit. The body and eye were drawn out like a “bow tie.”  The two sides were forge welded together to form the body.  The eye was further refined by forging over a steel mandrel to arrive at the desired socket shape.

IMG_4468
A fine rasp is used to carefully shaped the top of the haft to create a tight fit with the eye socket.

The hardwood haft is made from hand hewn oak. Careful attention is given to the grain direction. Having the grain run parallel with the head (edge to poll) helps to prevent cracking when a powerful cut is made.  I use rasps and scrapers to shape the top of the haft to a tight fit with the eye socket.  This helps to prevent the axe head from twisting or moving during use.

IMG_4471
The wedge is pre-fit to the top of the haft to create the correct amount of widening to secure the head to the haft.

Once the top of the haft is correctly shaped for the socket, I carefully saw a slot for the wedge.  The wedge is cut from the same section of wood as the haft so the grain direction and size will be similar to the haft.  The wedge is then pre-fitted to the slot.  This creates a mushrooming of the haft above the top of the axe head that secures the head in place.

I then give the haft its final sanding followed by multiple applications of Danish oil to seal and harden the wood. Once the Danish oil is dry, I buff the haft with ultra-fine steel wool to give it a smooth, semi-gloss finish.

click thumbnails to enlarge:

Specifications:

  • Body and Eye: 1018 low carbon steel
  • Edge Bit: 1080 high carbon steel
  • Haft wood: Oak
  • Blade Length (toe to heel of bit): 4″ (10,16 cm)
  • Axe Head Length (edge bit to poll): 5.25″ (13,34 cm)
  • Haft Length: 27.25″ (69,22 cm)
  • Overall Length: 27.75″ (74,0 cm)
  • Axe Head Weight: 0.86 pounds (392,0 grams)
  • Weight: 1.46 pounds (663,8 grams)

Price: $550 USD (plus shipping) SOLD

If you are interested in purchasing this axe, contact me at eric@crownforge.net or ericmycue374@comcast.net.