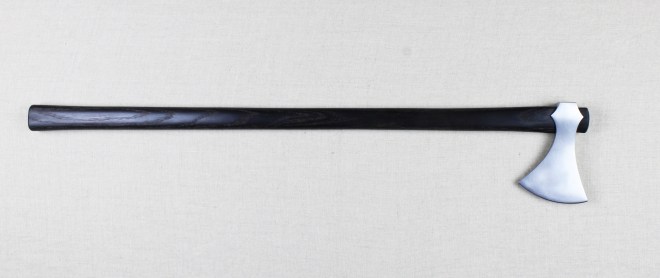
This is the final axe in a series of three hand forged, single-hand war axes I’ve been finishing. Like the previous two axes, this axe is patterned after the many examples of late 10th to early 11th century single-hand war axes. This type of axe was an agile yet brutal weapon that would have been a common choice for a soldier fighting in close quarters or in a shield wall. ……………………………………………………………………………………………..
This axe features a 1018 low-carbon steel body and eye socket and a 1080 high-carbon steel bit. The body and eye were drawn out like a “bow tie.” The two sides were forge welded together to form the body. The eye was further refined by forging over a steel mandrel to arrive at the desired socket shape. ………………………………………………………………………………………………………………………………………………………………………………………………………………………………………………………………………………………………………………………………….
The hardwood haft is made from hand hewn oak. Careful attention is given to the grain direction. Having the grain run parallel with the head (edge to poll) helps to prevent cracking when a powerful cut is made. I use rasps and scrapers to shape the top of the haft to a tight fit with the eye socket. This helps to prevent the axe head from twisting or moving during use. ………………………………………………………………………………………………………………………………………………………………………………………………………………………………………………………………………………………………………………………………………………………………………………………………………………………………………………………………………………………………………………………………………………………………………………………………………………………….
The wedge is pre-fit to the top of the haft to create the correct amount of widening to secure the head to the haft.
Once the top of the haft is correctly shaped for the socket, I carefully saw a slot for the wedge. The wedge is cut from the same section of wood as the haft so the grain direction and size will be similar to the haft. The wedge is then pre-fitted to the slot. This creates a mushrooming of the haft above the top of the axe head that secures the head in place. …………………………………………………………………………………………………………………………………………………………………………………………………………………………………………………………………………………………………………………………………………………………………………………………………………………………………………………………………………………………………………………………………………………………………………………………………………………………………………………………………………………………………………………………………………………………………………………………………………………………………………………………………………………………………………………………………………………………………………………………………………
Tannic acid and iron acetate are applied to the haft. The two solutions react in the fibers of the wood staining it black
The haft was also ebonized to give it a faux bog oak appearance. This process, which I explain in my essay “Making Your Own Bog Oak Axe Haft,” deeply stains the wood fibers giving the haft the inky black appearance of bog oak. Unlike regular wood stains, this process occurs in the wood fibers and creates a much more durable finish. …………………………………………………………………………………………………………………………………………………………………………………………………………………………………………………………………………………………………………………………………………………………………………………………………………………………………………………………………………………………………………………………………………………………………………………………………………………………………………………………………………………………………………………………………………………………………………………………………………………………………………………………………………………………………………………………………………………………………………………………………………
click to enlarge images:
Specifications:
Body and Eye: 1018 low carbon steel
Edge Bit: 1080 high carbon steel
Haft wood: Oak
Blade Length (toe to heel of bit): 3.875″ (9,84 cm)
Axe Head Length (edge bit to poll): 5.375″ (13,65 cm)
I have been a long time collector of historical weapons but had no axes in my collection. I came across Eric’s work, and was impressed by his attention to detail. The axe arrived in perfect condition and did not disappoint. The axe is well made and excellently balanced. It is solid to swing and bites hard. The axe head itself is perfectly formed and fit perfectly to the shaft. The ebonizing effect is a beautiful addition to the oak, and brings out the grain in a way that stain would not.
The very first custom piece that I ordered was an Irish skean with a bog oak grip. While the knife itself was not that elaborate, I remember that the bog oak grip was excellent. It had an inky black color that really brought the whole piece together. Ever since that point, I have been drawn to bog oak.
It is hard to find a large enough piece of bog oak that has a really desirable inky blackness to it; so I’ve been experimenting with making my own bog oak in my shop (minus the bog and the thousands of years for the reaction to take place).
Bog woods form when the acidic, iron rich water (iron acetate) of the bog reacts with the tannins in the wood. This reaction stains the fibers of the wood. The color of the staining process ranges from dark brown to inky black.
An ebonized oak chair
Around the time of the 16th century, woodworkers utilized this reaction between iron acetate and tannic acid to turn woods black (or darker depending on the type wood). This process is know as ebonizing. Unlike stains which are more of a surface treatment, ebonizing (like bog wood) reacts in the fibers of the woods making the finish much more durable. In other words, the coloring is integral rather than just a surface treatment.
Armed with this information, I set out to make a bog oak haft. The first thing I did was to make the iron acetate. This was a simple process. I washed a pad of 0000 steel wool with soap and water to remove any oils, and I placed it in the mason jar. I then filled the jar to the top with Heinz white vinegar. You need to put a small hole in the lid because the reaction will give off a lot of gas. Which brings me to my next warning: Do not do this in your house because it produces a strong smell. After 5 days, the pad was completely gone. I then put another pad in the solution and left it for 5 more days. 5 days is enough time to give the vinegar an opportunity to dissolve all the steel it can handle. I then filtered the solution using coffee filters to remove any solids.
I put the iron acetate on the shelf and worked on the haft. Once I finished all of the shaping and fitting to the axe head, I sanded the haft to 320 grit. You want to use fresh sand paper and a light touch so you do not burnish the grain closed. This was something that happened on my smaller scale experiments. You want to raise the grain of the wood at least twice and sand again with 320 grit. Once I was finished with the sanding, I deglazed the wood with acetone to remove any oils that may be on the wood surface. I then set up my work table to do the ebonizing process.
The Quebracho powder is added to a smaller quantity of distilled water in a sealed jar. The jar is then agitated to help dissolve the powder.
The first step in ebonizing the haft was to make the tannic acid solution. After researching tannic acid powders, I contacted the fine people at Shellac.net and they advised me to purchase Quebracho bark powder. Quebracho powder is from the bark of the Quebracho tree and it contains 74-77% tannins which is much higher than other commercially available tannic acid powders. ……………………………………………………………………………………………………………………………………………………………………………………………………………………………………………………………………………………………………………………………………………………………………………………………………………………………………………………………………………………………………………………………………………………………………………………………………………………………………………………………………………………………………………………………………………………………………………………………………………………………………………………………………………………………………………………………………………………..
The correct amount of Quebracho bark powder is measure and mixed with 8 ounces of distilled water. After the powder is thoroughly mixed and in solution, more distilled water is added to bring the solution to the correct ratio of powder to water.
This stuff is a massive irritant, so I wore a respirator, nitrile gloves, and eye protection. I began the process of making the solution by putting the correct dry quantity in a mason jar and adding a portion of the required amount of warm distilled water. I put the lid on and shook the jar till the powder was completely dissolved. I then added the concentrate to the rest of the warm distilled water in a glass container. …………………………………………………………………………………………………………………………………………………………………………………………………………………………………………………………………………………………………………………………………………………………………………………………………………………………………………………………………………………………………………………………………………………………………………………………………………………………………………………………………………………………………………………………………………………………………………………………………………………………………………………………………………………………………………………………………………………………………………………………………………………………………………………………………………………………………………………………………………………………………………………………………………………………………………………………………………………………………………………………………………………………………………………………………………………….
The tannic acid solution is applied 4 or 5 times. The haft is allowed to dry in between each application.
Next, I brushed the tannic acid solution on the wood. From previous experiments, I developed a technique of brushing the solution onto the wood liberally for 5-8 minutes, and then allowing the wood to dry on the surface for 20-30 minutes before applying another coat. The goal is to allow the wood to absorb as much of the tannic acid solution as possible. I applied the solution 4-5 times, and let the haft dry completely for several hours. Note: at this point, the solution was not really a nasal irritant, so I removed my respirator. I still wore eye protection and nitrile gloves. …………………………………………………………………………………………………………………………………………………………………………………………………………………………………………………………………………………………………………………………………………………………………………………………………………………………………………………………………………………………………………………………………………………………………………………………………………………………………………………………………………………………………………….
Iron acetate solution is applied to the haft.
After several hours, the haft was dry and I started the next step: application of the iron acetate. Over the course of an hour, I applied iron acetate to the haft at 8-10 minute intervals.
At first, there was little reaction, but the following pictures will show the transformation of the wood over an hour. ………………………………………………………………………………………………………………………………………………………………………………………………………………………………………………………………………………………………………………………………………………………………………………………………………………………………………………………………………………………………………………………………………………………………………………………………………………………………………………………………………………………………………………………………
10-15 Minutes
After 10 to 15 minutes, the wood is starting to darken. The darkening occurs first in the grain lines. As the iron acetate soaks into the wood, more solution is brushed onto the haft.
At the 30 minute mark, the wood is noticeably darker. It looks similar to Wenge. At this point, the reaction can be stopped to create bog oak that is on the lighter side of the spectrum.
After the final wash with the tannic acid solution the reaction of iron acetate and tannic acid is complete and haft is dried over night. The color of the wood at this point is nearly jet black.
After the last application of iron acetate, I allowed the haft to dry completely. Once the haft was dry, I gave it a final wash in the tannic acid solution, and allowed it to dry overnight.
The next morning, I wiped the haft surface with a clean cloth to remove any dried solution. I then buffed the haft with 0000 steel wool. The staining from the reaction is deep in the wood fibers, so the steel wool did not remove or lighten any of the inky black color. The picture to the left shows what it looked like the next morning after being buffed with the steel wool. …………………………………………………………………………………………………………………………………………………………………………………………………………………………………………………………………………………………………………………………………………………………………………………………………………………………………………………………………………………………………………………………………………………………………………………………………………………………………………………………………………………………………………….
Recreation of a boy’s burial axe from the collection of Lee Jones with an ebonized oak haft.
Actual bog oak has a range of darkness to it: from dark brown to inky black. It is possible to select a wide range of shades by adjusting the amount of iron acetate you allow to soak into the wood and then rinsing it in distilled water once the desired darkness is reach. It is a good idea to stop a shade or two lighter than you want because even with the water rinse, the reaction will still continue in the fibers for a short time. When I made the haft for the recreation of the boy’s burial axe from Dr. Lee Jones’ collection, I wanted a lighter style of bog oak, so I only used a few applications of the iron acetate and rinsed it with distilled water when it was close to what I wanted. The picture on the left shows the final product. ……………………………………………………………………………………………………………………………………………………………………………………………………………………..
One of the big differences with this process and actual bog oak is the depth of the reaction. Actual bog oak has been exposed to the reaction for thousands of years, so the dark finish runs all the way into the center of the wood. I have found that I can achieve a depth of 2-2.5 mm by allowing the solution to soak into the wood with multiple applications. This makes a very durable finish. As I mentioned above, the steel wool did not remove or lighten any of the finish when I buffed the haft. I would, however, like to see if I can get the reaction to go deeper into the wood for the purpose of carving and other decorative elements. I’ve tried some smaller tests in my vacuum chamber with some promising results, and I plan to experiment with larger pieces to figure out the process. More to come in the future!
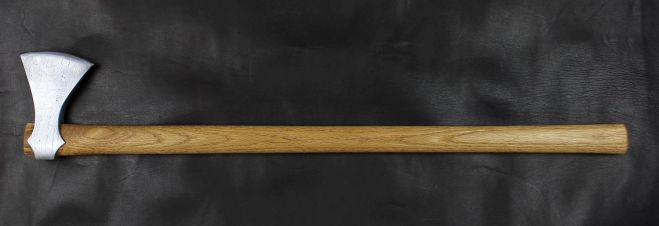
This is the second axe in a series of three hand forged, single-hand war axes I’ve been finishing. Like the single-hand, wrought iron axe, this axe is patterned after the many examples of late 10th to early 11th century single-hand war axes. This type of axe was an agile yet brutal weapon that would have been a common choice for a soldier fighting in close quarters or in a shield wall.
This axe features a 1018 low-carbon steel body and eye socket and a 1080 high-carbon steel bit. The body and eye were drawn out like a “bow tie.” The two sides were forge welded together to form the body. The eye was further refined by forging over a steel mandrel to arrive at the desired socket shape.
A fine rasp is used to carefully shaped the top of the haft to create a tight fit with the eye socket.
The hardwood haft is made from hand hewn oak. Careful attention is given to the grain direction. Having the grain run parallel with the head (edge to poll) helps to prevent cracking when a powerful cut is made. I use rasps and scrapers to shape the top of the haft to a tight fit with the eye socket. This helps to prevent the axe head from twisting or moving during use.
The wedge is pre-fit to the top of the haft to create the correct amount of widening to secure the head to the haft.
Once the top of the haft is correctly shaped for the socket, I carefully saw a slot for the wedge. The wedge is cut from the same section of wood as the haft so the grain direction and size will be similar to the haft. The wedge is then pre-fitted to the slot. This creates a mushrooming of the haft above the top of the axe head that secures the head in place.
I then give the haft its final sanding followed by multiple applications of Danish oil to seal and harden the wood. Once the Danish oil is dry, I buff the haft with ultra-fine steel wool to give it a smooth, semi-gloss finish.
click thumbnails to enlarge:
Specifications:
Body and Eye: 1018 low carbon steel
Edge Bit: 1080 high carbon steel
Haft wood: Oak
Blade Length (toe to heel of bit): 4″ (10,16 cm)
Axe Head Length (edge bit to poll): 5.25″ (13,34 cm)
This axe is patterned after the many examples of late 10th to early 11th century single-hand war axes. This type of axe was an agile yet brutal weapon that would have been a common choice for a soldier fighting in close quarters or in a shield wall.
Shaping the oak haft with rasp and scraper
This axe features a hand-forged, wrought iron eye socket and body. The high carbon bit was then forge-welded to the body. The wrought iron comes from a 19th century farm in rural Wisconsin. It was part of the iron banding from one of the old silos that was demolished on the farm.
I etched the head to bring out the gorgeous random pattern of the iron. I then used water stones and a leather strop to bring the bit edge to a hair shaving sharpness. It was then buffed to a near mirror finish to show a pleasing contrast between the edge and etched wrought iron. I hand shaped the kiln dried oak haft with rasps and scrapers and sanded it to a smooth consist finish. I sealed it with multiple coats of Danish oil.
Click thumbnails to expand
Specifications:
Body and Eye: 19th century wrought iron
Edge Bit: 1080 high carbon steel
Haft wood: Oak
Blade Length (toe to heel of bit): 3.625″ (9,2 cm)
Axe Head Length (edge bit to poll): 5.063″ (12,9 cm)
I had the pleasure of attending Fire and Brimstone 2017 hosted by the Baltimore Knife and Sword Co. The event was held at BKS’s facility in Marriottsville, Maryland (just outside Baltimore) and featured demonstrations from a number of expert bladesmiths.
Joel Donahue (L) and Me
The weekend started with me visiting with one of my closest friends and former Albion cutler-extraordinare: Joel Dohahue. Joel and I first met at Albion in the early 2000’s. I trained him to cutler swords, and he turned into one of the best sword cutlers Albion had. He is now an attorney who works for the Social Security Administration. Joel and his girlfriend, Susan, took me to some great places for food and drink.
(L to R) Me, Justin Mercier, JJ Simons (back at ya bro!), Matt Venier (Mr. Angry-Resting-Face), and Emiliano Carrillo off camera practicing Magnum or Blue Steel
I was also able to meet up with bladesmiths JJ Simon, Matt Venier, Emiliano Carrillo and Justin Mercier at the Walters Art Museum. The museum has a small collection of arms and armour, but many of the pieces were quite interesting.
Over the weekend, Mark Green, Daniel Cauble and Jesus Hernandez built and fired a Catalan smelter which yielded a good sized bloom made from Magnetite ore.
Mark Green charging the smelter as Jesus offers advice
Mark and Daniel consolidating the bloom
Another highlight of the weekend was Jeff Pringle and his atomic marshmallow crucible furnace. Jeff, an expert on crucible steel, managed to set a new F&B record with 7 pucks in one weekend. Most of them showed a great deal of promise.
Jeff Pringle lighting the Atomic Marshmallow
Jeff explaining some aspect of crucible steel. The legendary Wally Yater is sitting to his left.
Transformation is taking place!
Cooling down
Almost ready to be born
Jeff sharing with Wally Yater
Another highlight was the refining hearth that Emiliano Carrillo and Daniel Waddell constructed and fired.
Hearth being constructed
Adjusting the tuyere
Slag running out the hearth
Half of the refined bloomery steel from the smelter
It was an excellent weekend. I learned a great deal, and made a lot of new friends. I have plans in the near future to make my own crucible steel and build and fire my own hearth.
The original axe found in the Swedish History Museum
This 10th Century Broad Axe draws its inspiration from a fine example in the Swedish History Museum. It features a hand forged eye socket and axe body made from low carbon steel. The high carbon 1080 bit is forge welded to the body. Careful attention was given during the forging of this axe to create graceful, flowing lines and smooth transitions. The result is a lively axe with a razor sharp edge.
Shaping the ash haft with a steel scraper
The top of the ash wood haft is meticulously hewn to fit the eye socket in a precise manner. This detail ensures the axe head will stay secure during use. The rest of the haft is shaped and sanded to a smooth, comfortable finish. The entire haft is treated with linseed oil to preserve and harden the finish.
Specifications:
Body and Eye: 1018 low carbon steel
Edge Bit: 1080 high carbon steel
Haft wood: Ash
Blade Length (toe to heel of bit): 5.25″ (13,33 cm)
Axe Head Length (edge bit to poll): 6.25″ (15,88 cm)
I have been wanting an axe for a while now but hadn’t seen one that thrilled me until I saw this one by Eric McHugh. I’ve bought pieces from him previously so I knew the quality would be outstanding. It is! The shape of the components work perfectly together, it’s just great visually. The quality of the craftsmanship is absolutely top tier. Everything is just done beautifully. The edge is razor sharp. It feels great in hand too. One handed use is possible because of its excellent balance, but using it two handed really brings it to life. I couldn’t be more pleased with this axe and with everything about dealing with Eric. I liked the axe so much that I’m in talks with him about commissioning another piece. Nothing says you like what someone does better than return business, and Eric will have mine.
I’ve nearly finished a recreation of a boy’s burial axe that was found in a grave in Norway. I completed the final shaping of the profile. In addition, I polished the edge to a sharpness, and polished the axe to 800 grit. The next steps will be to etch it to bring out the random pattern in the iron, and then haft it.
The rusted original weights 314 grams, and my recreation come in at 344 grams. I’m quite happy with this weight considering the corroded condition of the original. I believe Dr. Lee Jones will be quite pleased with the completed piece.
Click images to enlarge:
I forged the axe slightly large so that it could be adjusted to the dimension on my drawing.
I have been a bladesmith since 2002. I focus on making european migration, Viking and medieval weapons. I do at times delve into the weapons of other eras and cultures. I take a limited number of custom orders each year. If you are interested in commissioning a custom piece, contact me via email, and we can discuss your proposal.
In 1987, I joined the USAF. I completed aircrew training at Castle AFB, CA and spent the next 5 years as an Inflight Refueling Technician (Boom Operator) on KC-135’s. I left the AF in 1993 to attend college.
After completing my undergraduate degree, I began working with my wife, Sue, at an inner-city non-profit organization which provided assistance to low income families on the near Eastside of Indianapolis, IN. It was during this time, I began making knives, tools and scabbards as a hobby. It was also during this time that I met Howard and Amy Waddell the owners of Albion Armorers. In 2002, I made the decision to leave inner-city work, and work with Howard and Amy to establish Albion Armorers as a leading sword manufacturer.
Doing research with Swordsmith, Peter Johnsson
I hired on as an artisan, but was soon promoted to Head Cutler. The decision was made to start the famed “Next Generation” line of swords which utilized Peter Johnsson’s designs and research. I had the privilege to work side-by-side with Peter to bring these swords to life. I then began making my own custom weapons and art in a small forge with a business partner at a nearby shop. I incorporated much of what I learned from Peter into my own custom art.
When the economy went into recession, I made the decision to work for the Union Boilermakers in NW Indiana as a welder and high rigger. I gained valuable rigging experience working on large pressure vessels, boilers, basic oxygen furnaces, blast furnaces, CAT crackers as well as electrostatic precipitators, and other environmental controls. I mastered advanced welding and metalworking techniques that I utilize in my current custom work.
Recently, I made the decision to put my boilermaking career on hold to once again pursue being a fulltime artist. In addition to being a fulltime artist, I have rejoined the Albion team as the VP of Research and Development. My work is mainly focused on fabricating and maintaining Albion’s heat-treat equipment and bringing new designs to market.


 This is the final axe in a series of three hand forged, single-hand war axes I’ve been finishing. Like the previous two axes, this axe is patterned after the many examples of late 10th to early 11th century single-hand war axes. This type of axe was an agile yet brutal weapon that would have been a common choice for a soldier fighting in close quarters or in a shield wall. ……………………………………………………………………………………………..


 This axe features a 1018 low-carbon steel body and eye socket and a 1080 high-carbon steel bit. The body and eye were drawn out like a “bow tie.” The two sides were forge welded together to form the body. The eye was further refined by forging over a steel mandrel to arrive at the desired socket shape.


 Contact Info
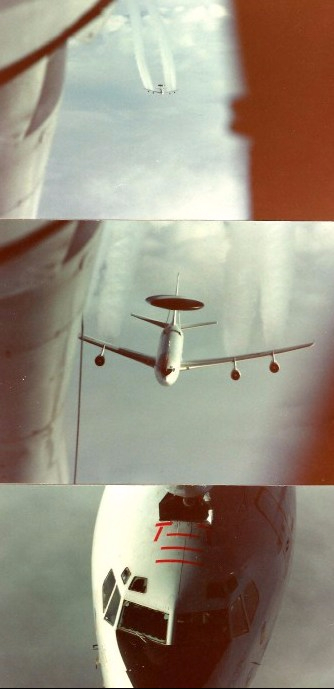

 When the economy went into recession, I made the decision to work for the Union Boilermakers in NW Indiana as a welder and high rigger. I gained valuable rigging experience working on large pressure vessels, boilers, basic oxygen furnaces, blast furnaces, CAT crackers as well as electrostatic precipitators, and other environmental controls. I mastered advanced welding and metalworking techniques that I utilize in my current custom work.
 Recently, I made the decision to put my boilermaking career on hold to once again pursue being a fulltime artist. In addition to being a fulltime artist, I have rejoined the Albion team as the VP of Research and Development. My work is mainly focused on fabricating and maintaining Albion’s heat-treat equipment and bringing new designs to market.


